Selasa, 24 Maret 2015

Memisahkan Traffic Game Online dan Browsing

Semakin hari kebutuhan akan manajemen jaringan semakin beragam. Hal ini tidak lepas dari semakin beragam nya pula layanan internet yang ada. Dari mulai portal berita, forum, sosial media serta game online yang saat ini banyak digemari pengguna internet.

Sebagai penyedia layanan akses internet, tentu kita ingin memberikan layanan terbaik sehingga semua kebutuhan pengguna internet dapat diakomodasi dan dapat menjalankan aktifitas browsing, chating maupun bermain game online dengan nyaman.
Problem yang biasa terjadi adalah ketika 2 atau lebih akses yang berbeda, seperti browsing dan game online terjadi pada satu jaringan yang sama, antara keduanya dapat saling menganggu.
Misalnya, pada warnet atau wargame (warnet dan game online) ketika banyak yang bermain game online, traffic browsing akan terganggu. Atau bisa juga terjadi sebaliknya. Yang dimaksud game online disini adalah game yang sudah terinstall di PC, kemudian dimainkan secara online, bukan game yang disediakan oleh website-website tertentu.
Pada artikel ini, akan diulas bagaimana cara memisahkan dan melakukan manajemen yang berbeda untuk traffic browsing dan game online.
Mangle
Traffic browsing dan game online dapat dibedakan berdasarkan protocol dan port yang digunakan. Fitur yang dapat digunakan untuk kebutuhan tersebut adalah mangle, dimana mangle dapat digunakan untuk menandai (marking) paket data berdasarkan port, protocol, src dan dst address, serta paramater lain yang dibutuhkan.
Untuk kasus ini, berarti kita harus mengetahui protocol dan port berapa yang digunakan oleh game online untuk menjalankan fungsi nya. Ada 2 cara untuk mendapatkan informasi tersebut.
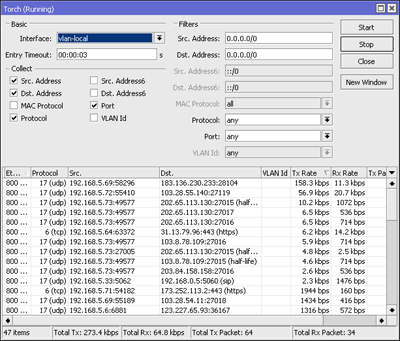
Pertama, dengan melakukan Torch pada saat client menjalankan game tersebut. Sehingga akan didapat port dan protocol yang digunakan.
Disamping itu, kita bisa mencari referensi lain dari internet, dimana sudah banyak yang berhasil mengetahui port dan protocol yang digunakan oleh setiap game online yang ada. Tentu setiap game menggunakan port dan protocol yang berbeda.
Jika dilihat sebenarnya tipe traffic yang akan di-manage bisa digolongkan menjadi 2 tipe saja, yaitu traffic game online dan traffic selain game online (browsing,chating,dsb). Maka kita bisa membuat mangle untuk game online terlebih dahulu, baru setelahnya buat untuk selain game online berdasarkan port dan protocol yang sudah di dapat sebelumnya.
Mangle Game Online
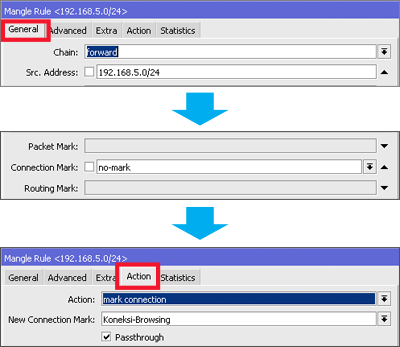
Untuk pembuatan mangle game, karena cukup banyak game-game yang akan di-mangle, akan lebih mudah jika dibuat mark-connection semua game terlebih dahulu dengan marking yang sama.
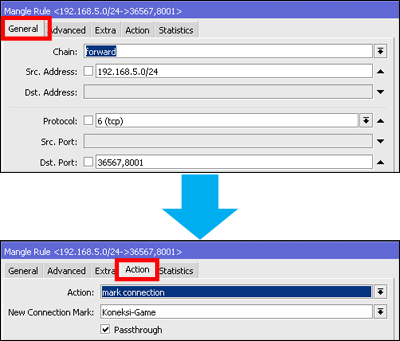
Langkah di atas merupakan salah satu contoh melakukan mar-connection dengan game yang menggunakan protocol tcp port 36567,8001 . Untuk game lakukan dengan langkah yang sama, sesuaikan protocol dan port yang digunakan.
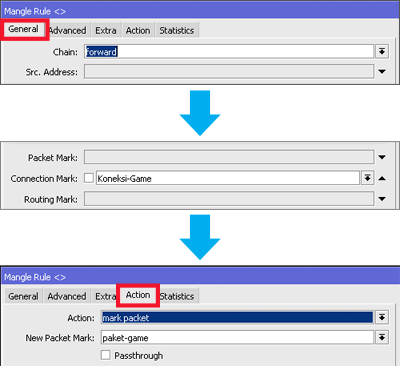
Setelah langkah mark-connection selesai, barulah dibuat mark-packet berdasar mark-connection=Koneksi-Game yang sebelumnya telah dibuat
Mangle Selain Game Online
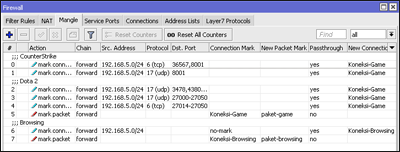
Pada langkah sebelumnya telah dibuat mangle untuk game. Selanjutnya tinggal dibuat mangle untuk traffic selain game online. Di dalam nya bisa terdapat traffic browsing,chating,dsb.
Sama dengan langkah marking pada traffic game, buat mark-packet setelah langkah mark-connection selesai.
Hasil akhir dari konfigurasi mangle seperti berikut

Manajemen bandwidth
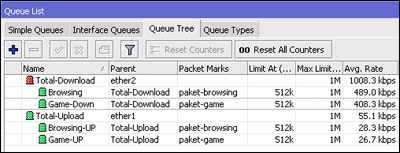
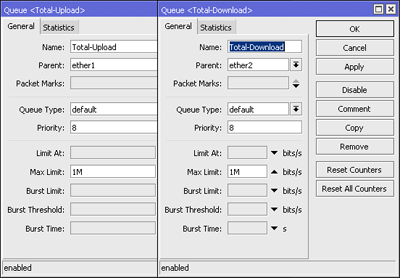
Pada artikel ini akan digunakan Queue tree untuk melakukan manajemen bandwidth berdasarkan mangle mark-packet yang sudah dibuat sebelumnya. Sebagai asumsi, bandwidth total yang dimiliki dedicated 1Mbps
Langkah pertama, definisikan terlebih dahulu total bandwidth yang ada, baik untuk upload maupun download.
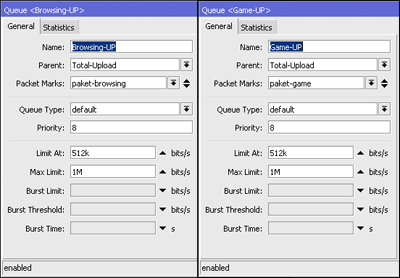
Selanjutnya, buat queue untuk traffic browsing dan game berdasarkan mark-packet yang sudah dibuat sebelumnya. Pada contoh ini menggunakan model HTB dengan bandwidth minimal (limit-at)=512k dan max-limit=1Mbps.
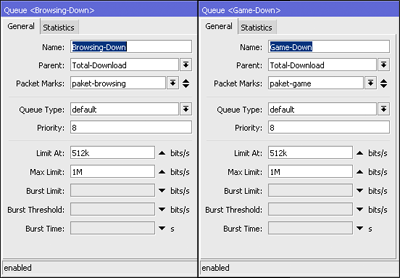
Lakukan juga untuk traffic browsing upload dan game upload

Test
Dengan menggunakan model HTB, antar traffic browsing dengan game sudah memiliki bandwidth garansi masing-masing, sehingga jika keduanya berjalan bersamaan tidak akan saling mengganggu.

Rabu, 11 Maret 2015

MR.BIG The Stories We Could Tell

Bagi yang belum punya album terbaru MR.Big silahkan Download album barunya link dibawah ini:
MR.BIG The Stories We Could Tell

Kamis, 05 Maret 2015

Configuring HP ProCurve Switch

Reset switch to factory defaults

If I’m not using brand new switch, I normally like to reset it back to factory defaults before doing anything.
Use a pointy object (like paper clip) and press “Reset” and “Clear” buttons on the front of the switch at the same time.
Release “Reset” button. When “Self Test” LED start to blink, release “Clear” button too. Now the switch should do it test routines. After that it should be back on factory defaults.

IP-Address


HP ProCurve Switch 2524# configure
HP ProCurve Switch 2524(config)# vlan 1
HP ProCurve Switch 2524(vlan-1)# ip address 10.0.0.1 255.255.255.0
HP ProCurve Switch 2524(vlan-1)# wr mem
HP ProCurve Switch 2524(vlan-1)# exit
HP ProCurve Switch 2524(config)# exit
HP ProCurve Switch 2524#

Configure VLANs


HP ProCurve Switch 2524# configure
HP ProCurve Switch 2524(config)# vlan 1
HP ProCurve Switch 2524(vlan-1)# name "Default"
HP ProCurve Switch 2524(vlan-1)# untag 2-6
HP ProCurve Switch 2524(vlan-1)# vlan 10
HP ProCurve Switch 2524(vlan-10)# name "First"
HP ProCurve Switch 2524(vlan-10)# untag 7-12
HP ProCurve Switch 2524(vlan-10)# vlan 20
HP ProCurve Switch 2524(vlan-20)# name "Second"
HP ProCurve Switch 2524(vlan-20)# untag 13-18
HP ProCurve Switch 2524(vlan-20)# exit
HP ProCurve Switch 2524(config)# exit
HP ProCurve Switch 2524#

Set up trunk ports


HP ProCurve Switch 2524# config
HP ProCurve Switch 2524(config)# trunk 23-24 trk1
HP ProCurve Switch 2524(config)# vlan 10
HP ProCurve Switch 2524(vlan-10)# tagged trk1
HP ProCurve Switch 2524(vlan-10)# vlan 20
HP ProCurve Switch 2524(vlan-20)# tagged trk1
HP ProCurve Switch 2524(vlan-20)# wr mem
HP ProCurve Switch 2524(vlan-20)# exit
HP ProCurve Switch 2524(config)# exit
HP ProCurve Switch 2524#

Disable all (but trunk) ports


HP ProCurve Switch 2524# configure
HP ProCurve Switch 2524(config)# int 2-22 disable
HP ProCurve Switch 2524(config)# wr mem
HP ProCurve Switch 2524(config)# exit
HP ProCurve Switch 2524#

Enable only necessary ports


HP ProCurve Switch 2524# configure
HP ProCurve Switch 2524(config)# int 2-4 enable
HP ProCurve Switch 2524(config)# int 13-15 enable
HP ProCurve Switch 2524(config)# wr mem
HP ProCurve Switch 2524(config)# exit
HP ProCurve Switch 2524#

Set up speed etc.


HP ProCurve Switch 2524# configure
HP ProCurve Switch 2524(config)# int 2-4 speed-duplex 100-full
HP ProCurve Switch 2524(config)# int 13-15 speed-duplex auto
HP ProCurve Switch 2524(config)# wr mem
HP ProCurve Switch 2524(config)# exit
HP ProCurve Switch 2524#

Set time and date

Time and date on hh:mm and mm:dd:yyyy format

HP ProCurve Switch 2524# configure
HP ProCurve Switch 2524(config)# time 10:05
Mon Jan 1 10:05:28 1990
HP ProCurve Switch 2524(config)# time 08/24/2010
Tue Aug 24 10:05:41 2010
HP ProCurve Switch 2524(config)# wr mem
HP ProCurve Switch 2524(config)# exit
HP ProCurve Switch 2524#

Set hostname


HP ProCurve Switch 2524# configure
HP ProCurve Switch 2524(config)# hostname "ServerRoom1"
ServerRoom1(config)# wr mem
ServerRoom1(config)# exit
ServerRoom1#

Backup settings

After running “sh run” copy/paste all between line which start with “hostname” to “ServerRoom1#” example to notepad and save that file.

ServerRoom1# sh run
ServerRoom1#

Restore settings from backup

All you have to do is copy/paste all (except the first “Running configuration:” line) to notepad on “Backup settings” part to “HP ProCurve Switch 2524#”.
If you have set operator and/or manager passwords, don’t copy/paste the lines which start with password.

HP ProCurve Switch 2524# configure
HP ProCurve Switch 2524(config)#

Set manager and operator password


ServerRoom1# configure
ServerRoom1(config)# password all
New password for Operator: ********
Please retype new password for Operator: ********
New password for Manager: ********
Please retype new password for Manager: ********
ServerRoom1(config)#

Update firmware using tftp server

If you are using windows machine and need tftp server software, you should try 3CDaemon. It’s free, portable, and it works like a dream =)
Download newest firmware from HP’s website: Software for switches.
For my switch HP ProCurve 2524gl, newest firmware was F.05.72. I downloaded 2300_2500-Software-F0572.zip package and extracted it to “2300_2500-Software-F0572″ folder.
Now I have directory “2300_2500-Software-F0572″ with 2300_2500-RelNotes-F0572-59903102.pdf (Release Notes). I also have F_05_72.swi file and this .swi file is the firmware which you are going to use to update your switch.

ServerRoom1# configure
ServerRoom1(config)# copy tftp flash 10.0.0.100 F_05_72.swi
Device will be rebooted, do you want to continue [y/n]? y
00126K

After F_05.72.swi is copied to the switch, you should get this kind of line. When eve everything goes ok your switch will reboot itself:

Validating and Writing System Software to FLASH...

Update firmware using xmodem over serial connection

I normally use Microsoft Hyperterminal when I’m doing this because it’s pretty easy to use xmodem to upload files with hyperterminal
Download newest firmware from HP’s website: Software for switches For my switch HP ProCurve 2524gl newest firmware was F.05.72 so I downloaded 2300_2500-Software-F0572.zip package and extracted it to “2300_2500-Software-F0572″.
Now I have directory “2300_2500-Software-F0572″ with 2300_2500-RelNotes-F0572-59903102.pdf (Release Notes) and F_05_72.swi file and this .swi file is the firmware which you are going to use to update your switch)

HP ProCurve Switch 2524# configure
HP ProCurve Switch 2524(config)# copy xmodem flash
The Primary OS Image will be deleted, continue [y/n]? y
Press 'Enter' and start XMODEM on your host...

After hitting ‘Enter’, start uploading using hyperterminal from menu: “Transfer” => “Send File…” then click “Browse…” and find that F_05_72.swi file and choose Xmodem (Not “1K Xmodem”) protocol. Then hit “Send” button. When everything is done you should see this kind of message and after that switch should boot:

Validating and Writing System Software to FLASH...

[note]This configuration was done with HP ProCurve 2524 (J4813A) but most of this command should work with other procurve switches too.[/note]